Showing posts with label Dress It Up - decorating. Show all posts

Wednesday, January 19, 2011

Boys Room Redo

The story with the house we live in is a long, sad song.  It is in and ideal location and we love the neighborhood.  The size is adequate for us but beyond that - it has been kind of a headache.  We are renting and saving like crazy to be able to build a house but his house is WAY overpriced and the windows and door seals are all gone so the utility bills are ridiculous.  Anyway, we never intended this house to be a forever kind of place, more of a stop over on our way to our destination.  After a long series of events I won't bore you with, we decided that we will be here in this house for at least another year.  With that decision, I decided that I was sick of living in a stop over hotel and wanted to start making a home for my family.  My first project was our little boys room.  There are 3 bdrms on the main floor but one of them is really small - so Isaiah is occupying that one with a single bed which is a nice space for him and the other one is very long and narrow with 2 enormous windows so it is really difficult to come up with a good configuration for furniture.
I got the help of my handy, strong and handsome husband to do some lifting and moving and here is what we came up with:
Bunk beds for the twins - here they are reading before bed, and a twin for Benjamin:

It definitely is not out of a magazine!  We need some real night tables, a bed skirt and some curtains.  Unfortunately there is nothing I can do about the wall color which the picture makes look not bad at all!   In actuallity it kind of looks like a banana yellow with smoke damage - LOL!  Anyway, the boys LOVE their "new" room.
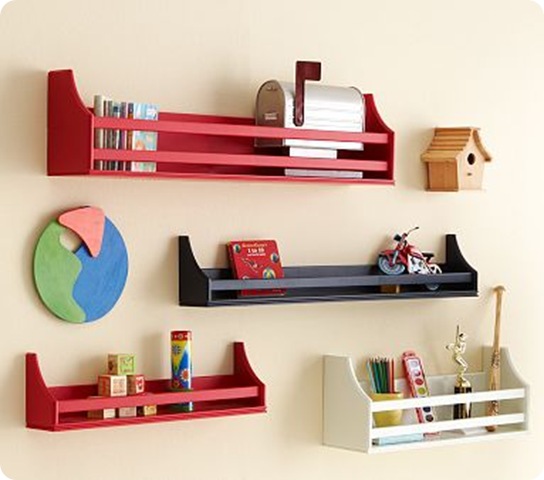
Have you seen these:

I love to read to the boys before bed and as they get older I'm not so anal about keeping their books out of reach because they won't chew, tear, and color them to pieces.  As soon as I saw these I thought they were such a great idea to have beside the boys beds.  Then Ana White from Knock Off Wood posted the amazing and easy instructions on how to make them.  THEN, Becky from Infarrantly Creative decided she would start another amazing blog called Knock Off Decor and she posted this little beauty made by Leslie from The Design File:

I have had an idea to create something like this for my own boys for some time and so, in keeping with my New Year's resolution to use what I have, I went out to the garage and brought in these old CD holders from ikea and had Andy drill some holes in them and hung them on the boys wall:
Each one got their own and they are loving them!  They are pretty plain right now but I'm planning on buying some vinyl stickers to decorate each one to make them more personal.  Here are the boys, enjoying their very own libraries:

Do you have something laying around that you could reuse for something other than its intended purpose?  If so, I'd love to hear about it!
Pin It

Friday, September 10, 2010

Decorating 101

Elizabeth, our son's girlfriend has come to live with us.  She is just a gem and we are so happy to have her.  I am especially happy to have another girl in the house.  All these boys I live with are finally realizing that I'm not an alien, I'm a girl, as they see her doing some of the weird things I do - he he!
Anyway, we needed to get a space ready for her since all of our home is boyified.  I can't EVEN tell you how much fun I had decorating for a girl!!!  Elizabeth is very feminine but not a fru fru lace and ruffles kind of girl so I knew exactly what I was trying to accomplish when I started out.  She has been accepted to The Art Institute for dress design so I really wanted to create a space that would reflect her personality, goals, dreams and also be a space that would inspire her to draw and sew and yet be very functional and practical as well.
Here is the before photo:
Now please keep in mind that we live in a rental house right now so painting the walls, changing the carpet, light fixtures and door knobs were not really an option since I wanted to invest in things she would be able to take with her when she moves away for school.
Thankfully the walls were just plain white which gave me a nice clean crisp canvas to work with!  I knew because of the lack of color on the walls I would need to add some major pops of color in the decorating elements.
I started out with this dress:
You may remember I posted a couple of years ago about my friend Melissa surprising me with this dress for my birthday.  I haven't been able to unwrap it and use it in my space b/c of all the boyishness so this was the perfect starting piece for this room.
Next I had my Great Grandmother's antique Singer sewing machine:
Another perfect addition (that really didn't have a place to live) for a dress designer's room!
Next I moved on to the bed.  I started with these amazing curtains and built a not so frilly small canopy:
Now I knew that I wanted to do black and this fuschia pink.  Feminine, chic, but not fru fru.  Next I found all of the bed linens:


Then I added this headboard I picked up second hand:


Every bed needs bedside tables so I added these tables and lamps which I also picked up second hand:
The tables were originally a cherry color so I sprayed them glossy black and added this frame with a pic of Elizabeth's Mom and Brother to make her feel at home.
I knew that Elizabeth would need a place to draw and sew so a desk was in order.  I had this cherry desk and chair with very granny like upholstery so I once again got out the spray paint - have I mentioned how much I love spray painting furniture - he he.  Here is the after photo of the desk and chair:
Notice the upholstery is still the old granny stuff but I just haven't found the perfect fabric yet.
Finally she needed a functional space for clothing and things.  Since the room doesn't have a closet, I picked up a clothes rack and used a set of rubbermaid drawers I had kicking around - not glamerous I know but they worked nevertheless:
I added the little basket for her to put goodies in.
All that was left now was to decorate - YAY!
I found this little dress form for hanging jewelry on:
and these pictures which literally could not be pryed out of my hands when I was leaving the store:

Are they not TOTALLY PERFECT for a future dress designer???!!!
I added this frame which I had with a pic of Elizabeth and Isaiah from Grad:
Lastly, I got some art supplies for her to create with and put them in this pretty & matching gift bag:
I fanned out some fashion magazines on the corner of her bed and voila:
This is the view when you open the door.
Moving around the room from left to right:
She was absolutely thrilled when she saw the room and I was so happy to do it for her!!  Doesn't make you feel good when you can do something to bless someone else!!
COST for ROOM:
dress - free
sewing machine - free
curtains - $20.00
other materials for canopy - $22.00
bed linens including matress cover, sheets and pillows - $111.00
headboard - $20.00
tables - $10.00
lamps - $5.00
frame - $6.00
basket - $10.00
spray paint - $40.00
jewelry dress form - $13.00
pictures - $60.00
clothes rack - $10.00
Grand Total:  327.00
I'd love to hear what you think of my little decorating effort! Pin It

Saturday, July 17, 2010

Peaceful Places

Hi Everybody!  Its a well known fact that our society this century is overcome with stress.  There are overwhelming numbers of people experiencing stress related illness such as ulcers, fibromyalgia, chronic fatigue syndrome, cancer, heart disease, high blood pressure, etc.  I thought today I'd share a little stress relief technique for you along with some decorating inspiration.
It is medically proven that if you practice this breathing exercise 10 - 15 min/day, at least 4 times a week it will actually calm your nervous system, resulting in less stress reaction in your body.  So here we go:
Breathe in with your diaphram (your abdomen should move but NOT your chest) to the count of 4:
1 One Thousand,
2 One Thousand,
3 One Thousand,
4 One Thousand.
Hold for 2 seconds and breathe out for the count of 4 again:
1 One Thousand,
2 One Thousand,
3 One Thousand,
4 One Thousand.
Try it, see if it works for you and let me know.
Now, for some decorating peace.  I have been collecting these pictures that made me feel peaceful:

Funny, I never realized it until now but all of these places seem to be outside at home.  Not some exotic island somewhere (although I'm pretty sure that could bring some stress releif too ;0).  Isn't that how it should be?  Our home should be our haven from the stresses of the world but sometimes, its our home that causes our stress.  What can you do this week to create a peaceful place in your home or yard?
Do you already have a place that makes you feel at peace?  A getaway where you can rejuvenate and breathe?  If you do, leave me a link, I'd love to hop on by and visit.
Until next time,
Breathe. Pin It

Monday, July 5, 2010

Front Doors

I have a TON of personal stuff to share with you:  pics from the carnival and Isaiah & Elizabeth's grad but in addition to that I've been thinking about how to make my blog more interesting.  I, of course, will continue to post paper crafting projects but I thought it might be fun to incorporate some other areas of interest into my blog and one of mine is interior decorating so I'm going to start this series with an appropriate subject - the front door.  I've heard that this is a pretty important feature in the exterior of your home.  There are lots of design experts that say your front door should be painted a different and darker color than your home. 
Here are some of my favs in no particular order:

So what do you think of these doors?  Which one is your fav?  Have any front door decorating tips you'd like to share?
If you have a great front door, one that is particularly interesting, one that has been recently painted or decorated, or one that you just think is special I'd LOVE to see it.  You can upload your pic here:

Can't wait to see what your friends and family see when they arrive at your home. Pin It
 
Pin It button on image hover